Welcome to Global Trainer’s platform!
Why Global Trainers
We have proven method of earning 10K to 50K in our platform. We have been doing Search Engine & Social media marketing strategy to bring enough students for you through our platform.
Pre-requisite to be a Trainer in Globaltrainers.in?
We encourage trainers having minimum 2 years of Training or Real time experience to join our platform.
What are the steps to be a Trainers?
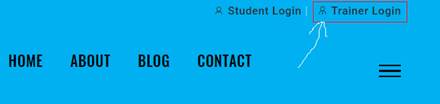
You need to create a trainer profile in our platform. Click on the “link Trainer Login”.
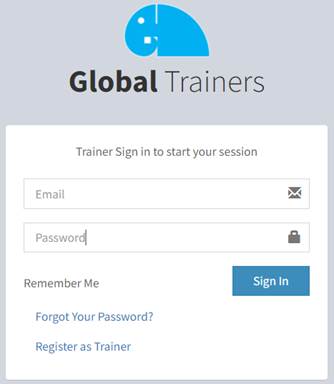
It will take you to the login page. If you have already Register as a Trainer. You can sign in. If you are first time user, click the link “Register as Trainer”
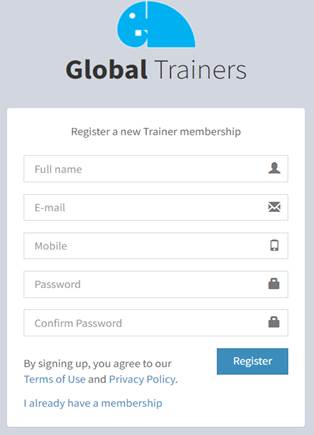
Enter the Full name, Email id, Mobile number, Password & confirm password. Then click “Register” button. The system will send you a mail to verify your mail id. Open your mail id & click the verify button. Once you verify your account, it will allow you to login the platform as Trainer.
Once you login to the platform you will find Trainer’s dashboard. Expand the “Profile” then click “View Profile”
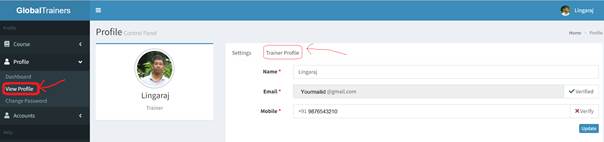
Then go to tab “Trainer Profile”
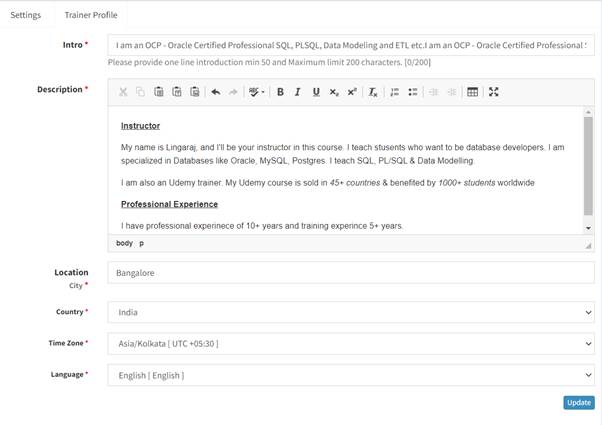
Intro: Provide a short intro about you.
Description: Provide about your real time & Trainer’s experience
Location: Provide your location
Country: Provide the country you belong to.
Time zone: Provide your time zone so that when any foreign student comes to your online class not get confused with the time. We automatically convert to respective time zone for students as per their time zones
Language: Provide the in which language you are going to conduct the class.
Once completed click on “Update” button
Well done!!!
You have completed the Trainer’s profile details
Next step is to create a Course.
How to create a course?
Expand the Course. Then click Create. This will open the below page
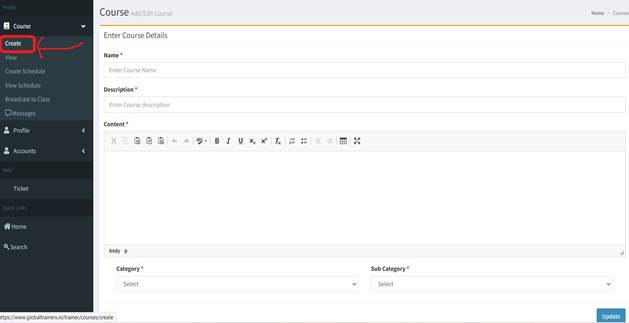
Enter the course Name Example: Oracle SQL Developer Tool- Tips & Tricks
Enter the course Description Example: Oracle SQL Developer Tool basics to Advanced
Enter the Contents: Enter the details you are going to cover in the class. Some sample template attached.
What you learn in this course.
- Installation & setup to start working with the tool
- Learning different components of Oracle SQL Developer tool
- Creating different types of objects (Table, View, Procedure etc.)
- Learn GUI setting like changing language of the tool, Font’s size increase, Worksheet & Result-set font type/size change.
- Code formatting techniques
- Mostly used short-cuts
- Exporting data into different formats (CSV, HTML, INSERT scripts etc.)
- Technique how to debug SQL & PLSQL code
- Connecting to third party databases like (Sybase, SQL Server, MySQL etc.)
- Migration of data from MySQL to Oracle
- How to create & schedule Oracle job
- Explain plan & Auto trace reports
- Finding the difference between two schemas
- Data modelling using both technique (Forward engineering & Reverse Engineering)
- Creating Ad-hoc reports & Graphs (Simple, Master-detail, Drilldown Reports + Gauge & Charts)
Target Students:
- Database Developers
- Database Administrators
- Data Scientist & Data Analysts
Prerequisite:
- Should have experience in Oracle SQL
- Should have a laptop or Desktop
- Should have Internet connection.
Finally enter the course Category & Sub category. Click Update to save the record.
Well done!!!
You have completed a course creation.
How to create a course schedule?
Once course is created, you need to create a schedule. Expand the Course. Then click the link “Create schedule”
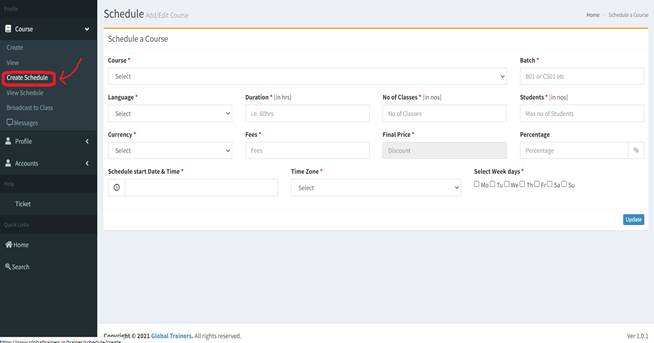
Course: Select the course you want to schedule
Note: You can create a course one time & schedule it multiple times
Batch: Give the batch name ie- B1, B2 or CS01, CS02 etc to track your class. If you add batch details you can identify, which student belongs to which class.
Language: Provide the language of instruction. In which language you are going to take your class.
Duration: Duration of your course ie- 30 hours, 50 hours etc
No. of classes: How many classes you are going to take.
Students: You can enter the maximum number of students you want to enrol
Currency: In which currency you want your students to pay you.
Fee: How much amount you charge as fee to each student
Percentage: How much discount you want to give to Students
Schedule Time: Provide the time you want to take the class
Time Zone: Provide your time zone
Weekdays: You can provide in which days you want to teach. Example you want only weekend classes, you can provide ‘Sa’ & ‘Su’
Finally click “Update” button to save the details
Congratulations!!!
You have completed a course schedule. Now your course is visible for students worldwide.
How to view enrolled students?
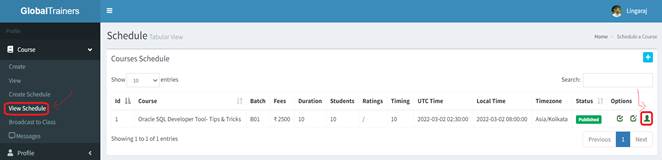
Expand the Couse menu, then click “View Schedule”. It will open above screen. Click on Student image right click to view all enrolled students.
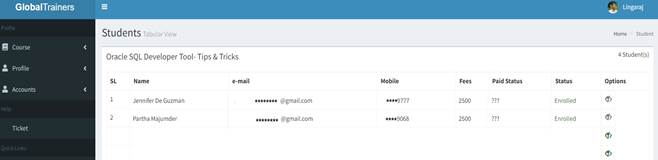
Right side of the row a there will be add student to class. If you click the button, it will add the enrolled students to class. So, any broadcast message, Assignments can be viewed by the students, who joined the class.